mirror of
https://github.com/pascallanger/DIY-Multiprotocol-TX-Module.git
synced 2026-03-22 16:10:02 +00:00
342 lines
13 KiB
Markdown
342 lines
13 KiB
Markdown
# DIY-Multiprotocol-TX-Module
|
|
Multiprotocol is a TX module which enables any TX to control lot of different models available on the market.
|
|
|
|
[Main Thread on RCGROUPS](http://www.rcgroups.com/forums/showthread.php?t=2165676)
|
|
|
|
|
|
|
|
##Compatible TX
|
|
|
|
###Using standard PPM output (trainer port)
|
|
The multiprotocol TX module can be used on any TX with a trainer port.
|
|
|
|
Channels order is AETR by default but can be changed in the source code.
|
|
|
|
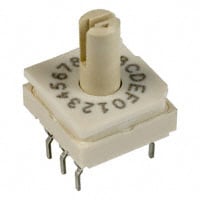
The protocol selection is done via a dip switch or a rotary dip switch for access to up to 15 different protocols.
|
|
|
|
|
|
|
|
###Using a serial output
|
|
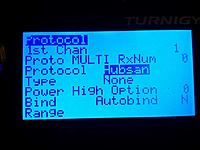
The multiprotocol TX module can be used on a Turnigy 9X, 9XR, 9XR Pro, Taranis, ... running er9x or ersky9X. (A version for OpenTX is being looked at)
|
|
|
|
Using this solution does not need any modification of the TX since it uses the TX module slot PPM pin for serial transfer.
|
|
|
|
Channels order is AETR by default but can be changed in the source code.
|
|
|
|
This enables full integration using the radio GUI to setup models with all the available protocols options.
|
|
|
|
|
|
|
|
Options are:
|
|
- Protocol and type: many main protocols have variants
|
|
- RX Num: number your different RXs and make sure only one model will react to the commands
|
|
- Power: High or low, enables to lower the power setting of your TX (indoor for example).
|
|
- Option: -127..+127 allowing to set specific protocol options. Like for Hubsan to set the video frequency.
|
|
- Bind: bind a RX/model
|
|
- Autobind: Yes or No. At the model selection (or power applied to the TX) a bind sequence will be initiated
|
|
- Range: test range by setting the transmission power to the lowest value
|
|
|
|
Note:
|
|
- there is 2 versions of serial protocol either 8 or 16 channels. 16 channels is the latest version. Make sure to use the right version based on your version of er9x/ersky9x.
|
|
|
|
###Telemetry
|
|
Telemetry is available for er9x and ersky9x TX.
|
|
There are only 2 protocols so far supporting telemetry: Hubsan and Frsky.
|
|
|
|
To enable telemetry on Turnigy 9X or 9XR you need to modify your TX following one of the Frsky mod like this [one](http://blog.oscarliang.net/turnigy-9x-advance-mod/).
|
|
|
|
|
|
##Protocols
|
|
|
|
###TX ID
|
|
Each protocol is using a 32bits ID generated randomely at first power up. There are little chances to get a duplicated ID.
|
|
|
|
It's possible to generate a new ID using bind button on the Hubsan protocol during power up.
|
|
|
|
###Bind
|
|
To bind a model press the bind button, apply power and then release.
|
|
|
|
###Protocol selection
|
|
|
|
####Using the dial for PPM input
|
|
Dial|Protocol|Sub_protocol|RF Module
|
|
----|--------|------------|---------
|
|
0|Select serial||
|
|
1|FLYSKY|Flysky|A7105
|
|
2|HUBSAN|-|A7105
|
|
3|FRSKY|-|CC2500
|
|
4|HISKY|Hisky|NRF24L01
|
|
5|V2X2|-|NRF24L01
|
|
6|DSM2|DSM2|CYRF6936
|
|
7|DEVO|-|CYRF6936
|
|
8|YD717|YD717|NRF24L01
|
|
9|KN|-|NRF24L01
|
|
10|SYMAX|SYMAX|NRF24L01
|
|
11|SLT|-|NRF24L01
|
|
12|CX10|CX10_BLUE|NRF24L01
|
|
13|CG023|CG023|NRF24L01
|
|
14|BAYANG|-|NRF24L01
|
|
15|SYMAX|SYMAX5C|NRF24L01
|
|
|
|
Notes:
|
|
- The dial selection must be done before the power is applied.
|
|
- The protocols and subprotocols can be personnalized by modifying the source code.
|
|
|
|
####Using serial input with er9x/ersky9x
|
|
Protocol|Sub_protocol|RF Module
|
|
--------|------------|---------
|
|
Flysky||A7105
|
|
|Flysky
|
|
|V9x9
|
|
|V6x6
|
|
|V912
|
|
Hubsan||A7105
|
|
Frsky||CC2500
|
|
Hisky||NRF24L01
|
|
|Hisky
|
|
|HK310
|
|
V2x2||NRF24L01
|
|
DSM2||CYRF6936
|
|
|DSM2
|
|
|DSMX
|
|
Devo||CYRF6936
|
|
YD717||NRF24L01
|
|
|YD717
|
|
|SKYWLKR
|
|
|SYMAX2
|
|
|XINXUN
|
|
|NIHUI
|
|
KN||NRF24L01
|
|
SymaX||NRF24L01
|
|
|SYMAX
|
|
|SYMAX5C
|
|
SLT||NRF24L01
|
|
CX10||NRF24L01
|
|
|CX10_GREEN
|
|
|CX10_BLUE
|
|
|DM007
|
|
CG023||NRF24L01
|
|
|CG023
|
|
|YD829
|
|
Bayang||NRF24L01
|
|
|
|
Note:
|
|
- The dial should be set to 0 for serial which means all protocol selection pins should be left unconnected.
|
|
|
|
###Protocol details
|
|
Extended limits supported: -125%..+125% can be used and will be transmitted. Otherwise the default is -100%..+100% only.
|
|
|
|
Autobind protocol: you do not need to press the bind button at power up to bind, this is done automaticaly.
|
|
|
|
####BAYANG
|
|
Autobind protocol
|
|
|
|
CH1|CH2|CH3|CH4|CH5|CH6|CH7|CH8|CH9|CH10|CH11|CH12|CH13|CH14|CH15|CH16
|
|
---|---|---|---|---|---|---|---|---|----|----|----|----|----|----|----
|
|
A|E|T|R|FLIP|HEADLESS|RTH
|
|
|
|
####CG023
|
|
Autobind protocol
|
|
|
|
CH1|CH2|CH3|CH4|CH5|CH6|CH7|CH8|CH9|CH10|CH11|CH12|CH13|CH14|CH15|CH16
|
|
---|---|---|---|---|---|---|---|---|----|----|----|----|----|----|----
|
|
A|E|T|R|FLIP|LIGHT|PICTURE|VIDEO|HEADLESS
|
|
|
|
MODE +100%=mode3 or headless for CX-10A, -100%=mode1, 0%=mode2
|
|
|
|
#####Sub_protocol YD829
|
|
CH5|CH6|CH7|CH8
|
|
---|---|---|---
|
|
FLIP|HEADLESS|PICTURE|VIDEO
|
|
|
|
####CX10
|
|
Extended limits supported
|
|
|
|
CH1|CH2|CH3|CH4|CH5|CH6|CH7|CH8|CH9|CH10|CH11|CH12|CH13|CH14|CH15|CH16
|
|
---|---|---|---|---|---|---|---|---|----|----|----|----|----|----|----
|
|
A|E|T|R|FLIP|MODE|PICTURE|VIDEO|HEADLESS
|
|
|
|
MODE +100%=mode3 or headless for CX-10A, -100%=mode1, 0%=mode2
|
|
|
|
####DEVO
|
|
Extended limits supported
|
|
|
|
CH1|CH2|CH3|CH4|CH5|CH6|CH7|CH8|CH9|CH10|CH11|CH12|CH13|CH14|CH15|CH16
|
|
---|---|---|---|---|---|---|---|---|----|----|----|----|----|----|----
|
|
CH1|CH2|CH3|CH4|CH5|CH6|CH7|CH8
|
|
|
|
####DSM2
|
|
Extended limits supported
|
|
|
|
CH1|CH2|CH3|CH4|CH5|CH6|CH7|CH8|CH9|CH10|CH11|CH12|CH13|CH14|CH15|CH16
|
|
---|---|---|---|---|---|---|---|---|----|----|----|----|----|----|----
|
|
A|E|T|R|CH5|CH6|CH7|CH8
|
|
|
|
####FLYSKY
|
|
Extended limits supported
|
|
|
|
CH1|CH2|CH3|CH4|CH5|CH6|CH7|CH8|CH9|CH10|CH11|CH12|CH13|CH14|CH15|CH16
|
|
---|---|---|---|---|---|---|---|---|----|----|----|----|----|----|----
|
|
A|E|T|R|CH5|CH6|CH7|CH8
|
|
|
|
#####Sub_protocol V9X9
|
|
CH5|CH6|CH7|CH8
|
|
---|---|---|---
|
|
UNK|LIGHT|PICTURE|VIDEO
|
|
|
|
#####Sub_protocol V6X6
|
|
CH5|CH6|CH7|CH8|CH9|CH10|CH11|CH12
|
|
---|---|---|---|---|---|---|---
|
|
FLIP|LIGHT|PICTURE|VIDEO|HEADLESS|RTH|XCAL|YCAL
|
|
|
|
#####Sub_protocol V912
|
|
CH5|CH6
|
|
---|---
|
|
BTMBTN|TOPBTN
|
|
|
|
####FRSKY
|
|
Extended limits supported
|
|
|
|
Telemetry enabled for A0, A1, RSSI
|
|
|
|
Option=fine frequency tunning, usually 0 or -41 based on the manufacturer boards
|
|
|
|
CH1|CH2|CH3|CH4|CH5|CH6|CH7|CH8|CH9|CH10|CH11|CH12|CH13|CH14|CH15|CH16
|
|
---|---|---|---|---|---|---|---|---|----|----|----|----|----|----|----
|
|
CH1|CH2|CH3|CH4|CH5|CH6|CH7|CH8
|
|
|
|
####HISKY
|
|
CH1|CH2|CH3|CH4|CH5|CH6|CH7|CH8|CH9|CH10|CH11|CH12|CH13|CH14|CH15|CH16
|
|
---|---|---|---|---|---|---|---|---|----|----|----|----|----|----|----
|
|
A|E|T|R|GEAR|PITCH|GYRO|CH8
|
|
|
|
GYRO -100%=6G, +100%=3G
|
|
|
|
####HK310
|
|
CH1|CH2|CH3|CH4|CH5|CH6|CH7|CH8|CH9|CH10|CH11|CH12|CH13|CH14|CH15|CH16
|
|
---|---|---|---|---|---|---|---|---|----|----|----|----|----|----|----
|
|
|||T|R|AUX|T_FSAFE|R_FSAFE|AUX_FSAFE
|
|
|
|
####HUBSAN
|
|
Autobind protocol
|
|
|
|
Telemetry enabled for battery voltage only
|
|
|
|
Option=vTX frequency (H107D) 5645 - 5900 MHz
|
|
|
|
CH1|CH2|CH3|CH4|CH5|CH6|CH7|CH8|CH9|CH10|CH11|CH12|CH13|CH14|CH15|CH16
|
|
---|---|---|---|---|---|---|---|---|----|----|----|----|----|----|----
|
|
A|E|T|R|FLIP|LIGHT||VIDEO
|
|
|
|
####KN
|
|
CH1|CH2|CH3|CH4|CH5|CH6|CH7|CH8|CH9|CH10|CH11|CH12|CH13|CH14|CH15|CH16
|
|
---|---|---|---|---|---|---|---|---|----|----|----|----|----|----|----
|
|
A|E|T|R|DR|THOLD|IDLEUP|GYRO3
|
|
|
|
GYRO3 -100%=6G, +100%=3G
|
|
|
|
####SLT
|
|
Autobind protocol
|
|
|
|
CH1|CH2|CH3|CH4|CH5|CH6|CH7|CH8|CH9|CH10|CH11|CH12|CH13|CH14|CH15|CH16
|
|
---|---|---|---|---|---|---|---|---|----|----|----|----|----|----|----
|
|
A|E|T|R|GEAR|PITCH
|
|
|
|
####Symax
|
|
Autobind protocol
|
|
|
|
CH1|CH2|CH3|CH4|CH5|CH6|CH7|CH8|CH9|CH10|CH11|CH12|CH13|CH14|CH15|CH16
|
|
---|---|---|---|---|---|---|---|---|----|----|----|----|----|----|----
|
|
A|E|T|R|FLIP||PICTURE|VIDEO|HEADLESS
|
|
|
|
####V2X2
|
|
CH1|CH2|CH3|CH4|CH5|CH6|CH7|CH8|CH9|CH10|CH11|CH12|CH13|CH14|CH15|CH16
|
|
---|---|---|---|---|---|---|---|---|----|----|----|----|----|----|----
|
|
A|E|T|R|FLIP|LIGHT|PICTURE|VIDEO|HEADLESS|MAG_CAL_X|MAG_CAL_Y
|
|
|
|
####YD717
|
|
Autobind protocol
|
|
|
|
CH1|CH2|CH3|CH4|CH5|CH6|CH7|CH8|CH9|CH10|CH11|CH12|CH13|CH14|CH15|CH16
|
|
---|---|---|---|---|---|---|---|---|----|----|----|----|----|----|----
|
|
A|E|T|R|FLIP|LIGHT|PICTURE|VIDEO|HEADLESS
|
|
|
|
##Hardware
|
|
|
|
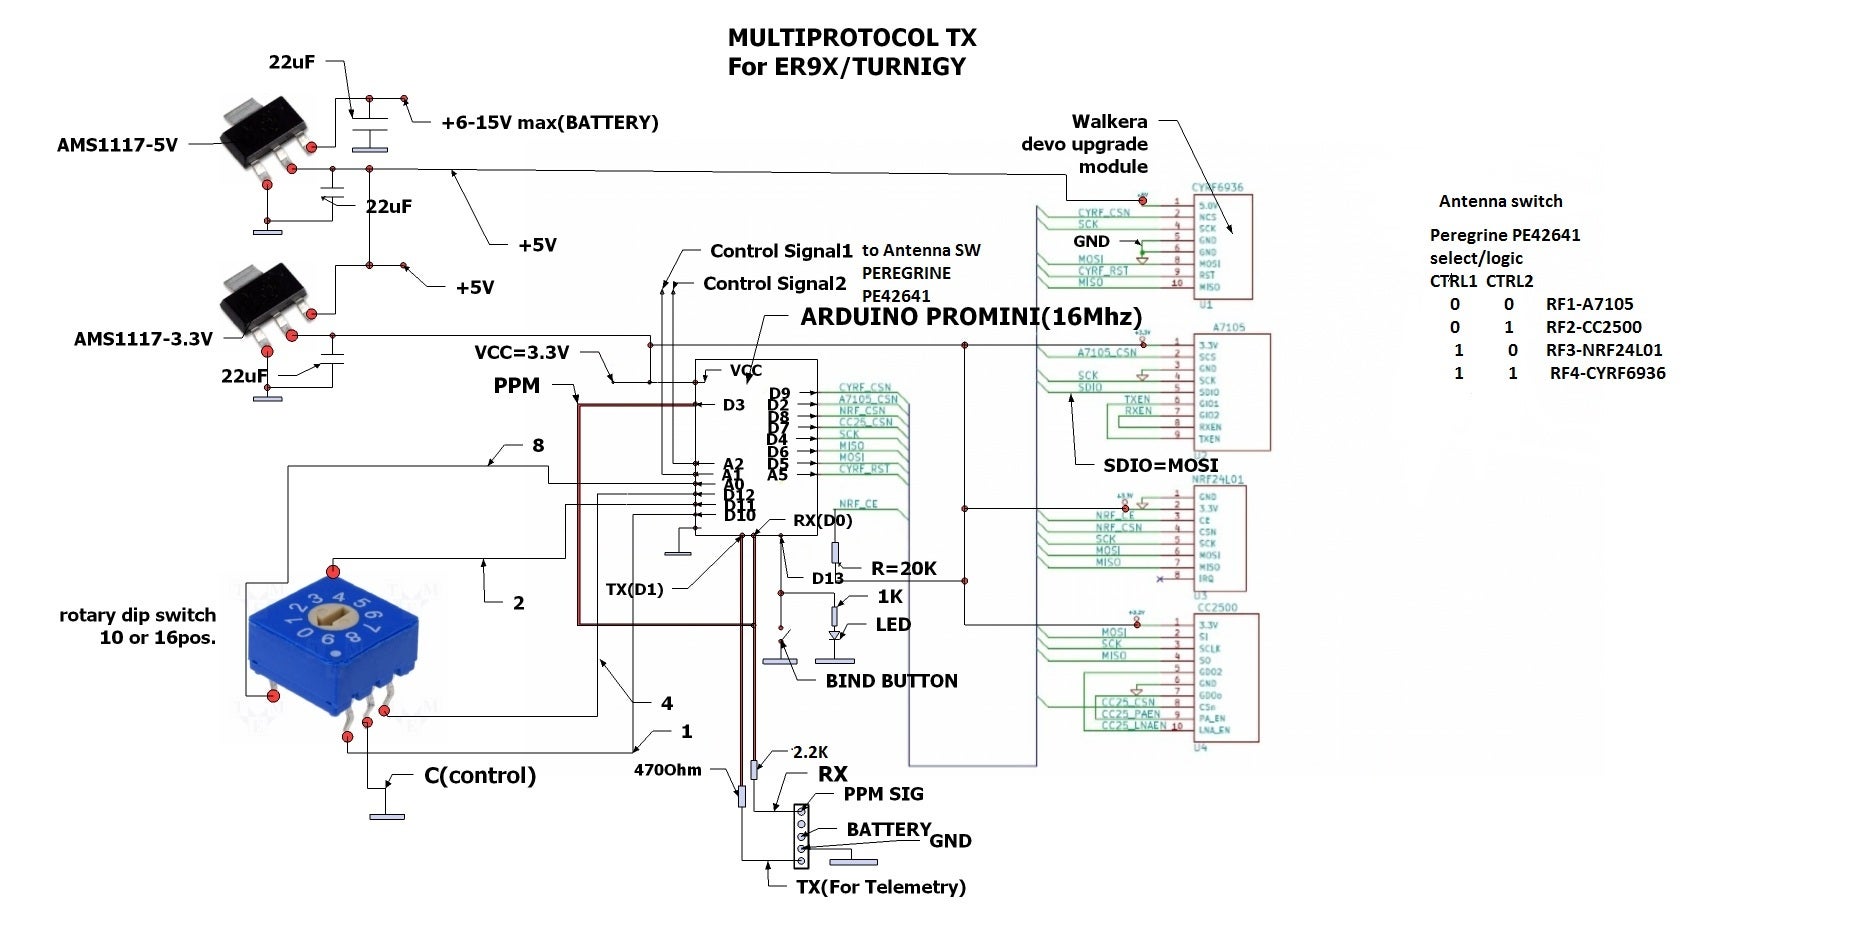
###RF modules
|
|
Up to 4 RF modules can be installed:
|
|
- [A7105](http://www.banggood.com/XL7105-D03-A7105-Modification-Module-Support-Deviation-Galee-Flysky-p-922603.html) for Flysky, Hubsan
|
|
- [CC2500](http://www.banggood.com/CC2500-PA-LNA-Romote-Wireless-Module-CC2500-SI4432-NRF24L01-p-922595.html) for Frsky
|
|
- [CYRF6936](http://www.ehirobo.com/walkera-wk-devo-s-mod-devo-8-or-12-to-devo-8s-or-12s-upgrade-module.html) for DSM2, DSMX, DEVO, Walkera
|
|
- [NRF24L01](http://www.banggood.com/2_4G-NRF24L01-PA-LNA-Wireless-Module-1632mm-Without-Antenna-p-922601.html) for Hisky, V2x2, CX-10, SYMAX and plenty other protocols
|
|
|
|
RF modules can be installed for protocols need only. Example: if you only need the Hubsan protocol then install only a A7105 on your board.
|
|
|
|
You also need some [antennas](http://www.banggood.com/2_4GHz-3dBi-RP-SMA-Connector-Booster-Wireless-Antenna-Modem-Router-p-979407.html) and [cables](http://www.banggood.com/10cm-PCI-UFL-IPX-to-RPSMA-Female-Jack-Pigtail-Cable-p-924933.html).
|
|
|
|
###Microcontroller
|
|
The main program is running on a ATMEGA328 running @16MHz and 3.3V.
|
|
An [Arduino pro mini](http://www.banggood.com/Wholesale-New-Ver-Pro-Mini-ATMEGA328-328p-5V-16MHz-Arduino-Compatible-Nano-Size-p-68534.html) can be used to build your own Multimodule.
|
|
|
|
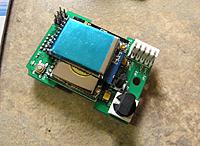
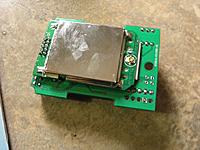
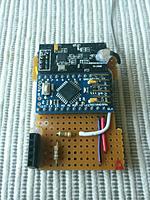
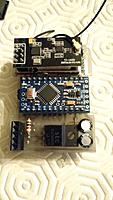
Using stripboard:
|
|
|
|
|
|
|
|
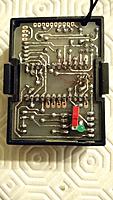
Using a [home made PCB](http://www.rcgroups.com/forums/showpost.php?p=32645328&postcount=1621):
|
|
|
|
|
|
|
|
|
|
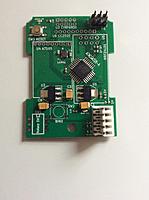
or build your own board using SMD components and an associated PCB:
|
|
|
|
|
|
 
|
|
|
|
###Schematic
|
|
|
|
Attention: All modules are 3.3V only, never power them with 5V.
|
|
|
|
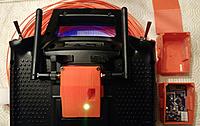
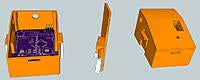
###Radio integration
|
|
You can 3D print your box (detalis [here](http://www.rcgroups.com/forums/showpost.php?p=33294140&postcount=2034)):
|
|
|
|
|
|
|
|
|
|
##Compilation
|
|
|
|
###Toolchain
|
|
Arduino 1.6.5
|
|
|
|
Compilation of the code posted here works. So if it doesn't for you this is a problem with your setup, please double check everything before asking.
|
|
|
|
Multiprotocol.ino header can be modified to compile with/without some protocols, change protocols/sub_protocols associated with dial for PPM input, different channel orders, different channels timing, 8 or 16 channels serial protocol, Telemetry or not, ...
|
|
|
|
###Upload the code using ISP (In System Programming)
|
|
It is recommended to use an external programmer like [USBASP](http://www.banggood.com/USBASP-USBISP-3_3-5V-AVR-Downloader-Programmer-With-ATMEGA8-ATMEGA128-p-934425.html) to upload the code in the Atmega328. The programmer should be set to 3.3V or nothing to not supply any over voltage to the multimodule and avoid any damages.
|
|
|
|
From the Arduino environment, you can use this shortcut to compile and upload to the module: Skecth->Upload Using Programmer (Ctrl+Maj+U)
|
|
|
|
###Set fuses
|
|
Use a tool like [AVR Burn-O-Mat](http://avr8-burn-o-mat.aaabbb.de/) to set the fuses of the Atmega328 to:
|
|
- Low Fuse 0xFF
|
|
- High Fuse 0xD2
|
|
- Extended Fuse 0x05
|
|
|
|
This will make sure your ATMEGA328 is well configured and the global TX ID is not erased at each updates.
|
|
|
|
##Troubleshooting
|
|
|
|
###LED status
|
|
- off: program not running or a protocol selected with the associated module not installed.
|
|
- slow blink: serial has been selected but no valid signal has been seen on the RX pin.
|
|
- fast blink: bind in progress.
|
|
- on: normal operation.
|
|
|
|
###Bind
|
|
Make sure to follow the following procedure: press the bind button, apply power and then release it after 1sec. The LED should be blinking fastly indicating a bind status and then fixed on. It's normal that the LED turns off when you press the bind button, this behavior is not controlled by the Atmega328.
|
|
|
|
###Protocol selection
|
|
For serial, leave all 4 selection pins unconnected.
|
|
For PPM, connect 1 to 4 of the selection protocol pins to GND.
|
|
The protocol/mode selection must be done before the power is applied.
|